
![]()
![]()
![]()
![]()
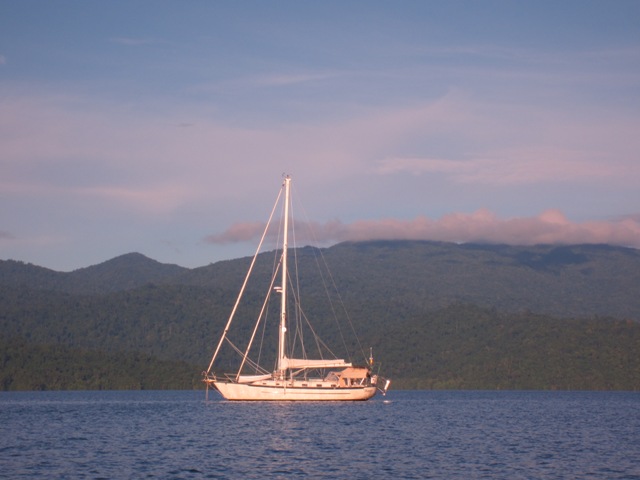
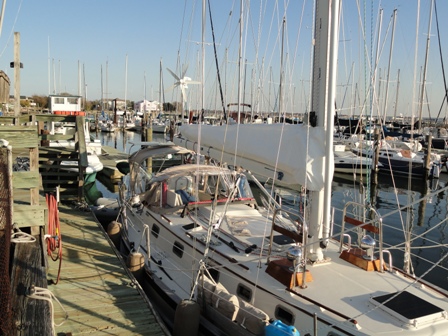
| Shango is a Pacific Seacraft 40, hull #2, built in 1996. We are the third owners and purchased her in July 2005. After returning from our first Bahamas cruise in 2002, we went in search of a more suitable boat for extended short-handed cruising. Great Notions our Ericson 35 had performed admirably but was not always up to the challenges we put her through. The highest priorities in our search were: •a more rugged boat with sufficient displacement to stand up to prolonged abuse from seas and wind •cutter rig •shallow draft •a powerful and dependable engine •sufficient below deck space for my 6"4" frame and all our junk •respectable sailing characteristics •a size and design that we felt comfortable handling in both demanding at sea conditions as well as in tight docking situations with wind and current •the intangible ability to reach out to both of us with her design, fit and finish. Although Amy had a double ender prior to our meeting, this was not necessarily a high priority in our search. After many boat shows and much web research we kept coming back to the Pacific Seacraft 40 as the boat that seemed right for us. The Pacific Seacraft 40 certainly has compromises and drawbacks like all boats but so far she seems to be working out well for us. The previous two owners were from the west coast and although we live in Newburyport, MA we actually bought the boat in Seattle from Tom Cooper at Seacraft Yacht Sales. Buying the boat in Seattle gave us a great excuse to sail to the Gulf and San Juan Islands, see friends in Oregon and Washington, and get married in Victoria, B.C.
|
|
| The boat's first owners had done a very good job with her initial outfitting
and her ongoing maintenance. The second owners had her for only a short time
before their sailing plans changed. Although as of 12/2017 Shango is 21 years
old, we think
that she has aged quite well. She was a wonderful boat for our 2007 and 2009 cruises
to the Bahamas and the Caribbean and she could not have performed better
throughout our circumnavigation. In every off-shore experience to
date we have felt safe and secure. She had a real test as all boats do crossing
the Indian Ocean. During a 3 day stretch we had consistent trades above 40 knots
and gusts over 50 knots with 20 foot seas. We were on a broad reach with a
partially furled staysail and triple reefed main and were quite comfortable
around the clock after we got used to the sound of the roaring wind and seas. We
did feel however that if those consistent 40 knots had been a consistent 50
knots we would have liked a deeper third reef. We therefore have added a 4th
reef which reduces our mainsail down to 18% of its total from the standard 25%
for a third reef. We hope we never have to use the new fourth reef! With
her new sails, we are
also enjoying her sailing abilities despite always loading her down with too
much fuel, over-sized chain and anchor,
and way too many spares, supplies, and beer. On our passage from Panama to the
Galapagos, with a consistent 15-25 knots she averaged 7.1
knots over the 900 mile passage and recorded three days in excess of 190 miles.
Despite her short waterline she seems to find a way to keep pace with many of her larger cruising
companions. In sum, we're very happy with our Pacific Seacraft 40 choice. We
certainly understand the benefits that a larger 45-50 foot boat would bring in
terms of creature comforts, guest space, a larger watermaker, and a dedicated
work space, but for the two of us we have found a way to manage quite well
with our 40 feet.
For those of you interested in more boat details we have listed the upgrades and refits that we have made since 2006. |
Post
Circumnavigation Upgrades 2015-2017
Manufacturer's Rebuilds:
After five years of continual use and thousands of miles of passages, Shango was ready for some TLC. The following gear was returned to the respective manufacturers for rebuilding/reconditioning:
Lighthouse Windlass
Spectra Clark Pump
Monitor Windvane
Although these three items were working fine upon our return, we decided to
have them returned to the best possible condition by the manufacturers before
we headed out again. These are three of our most valued systems so we felt
that the investment was worthwhile.
Yanmar Rebuild by Merri-Mar
Yacht Basin
As we always joke, the most important piece of equipment on a sailboat,
especially a cruising sailboat, is the engine. We logged 2830 hours on our
engine during our 5 year circumnavigation and the total hours on our 1996 Yanmar
4JH2-TE upon our return was a little shy of 6000 hours. We
had purchased nearly every spare imaginable for our trip, some of which we had
used, many of which we had not. We decided to install all our new and unused
spares, do a compression test, and while we were at it, repaint the engine. So
we removed the engine allowing much easier access for Mike at Merri Mar to
install the spares and also
allow for a more complete paint job.
The following unused spares were installed:
Injector Pump
Injectors
Turbocharger
Fresh Water Pump
Raw Water Pump
Starter
Oil Cooler
Throttle and Shifting Cables
Engine Mounts
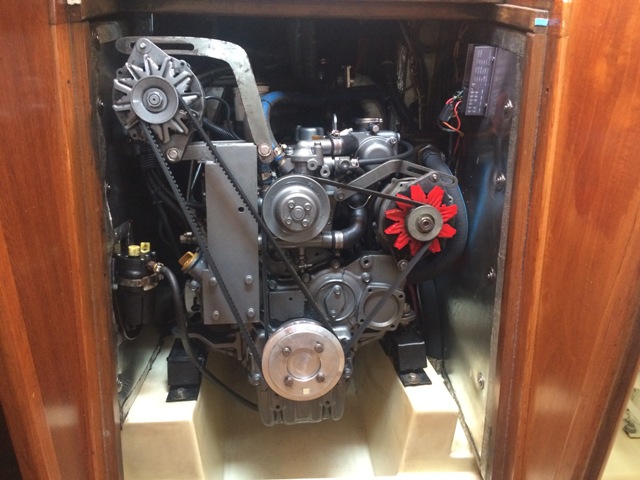
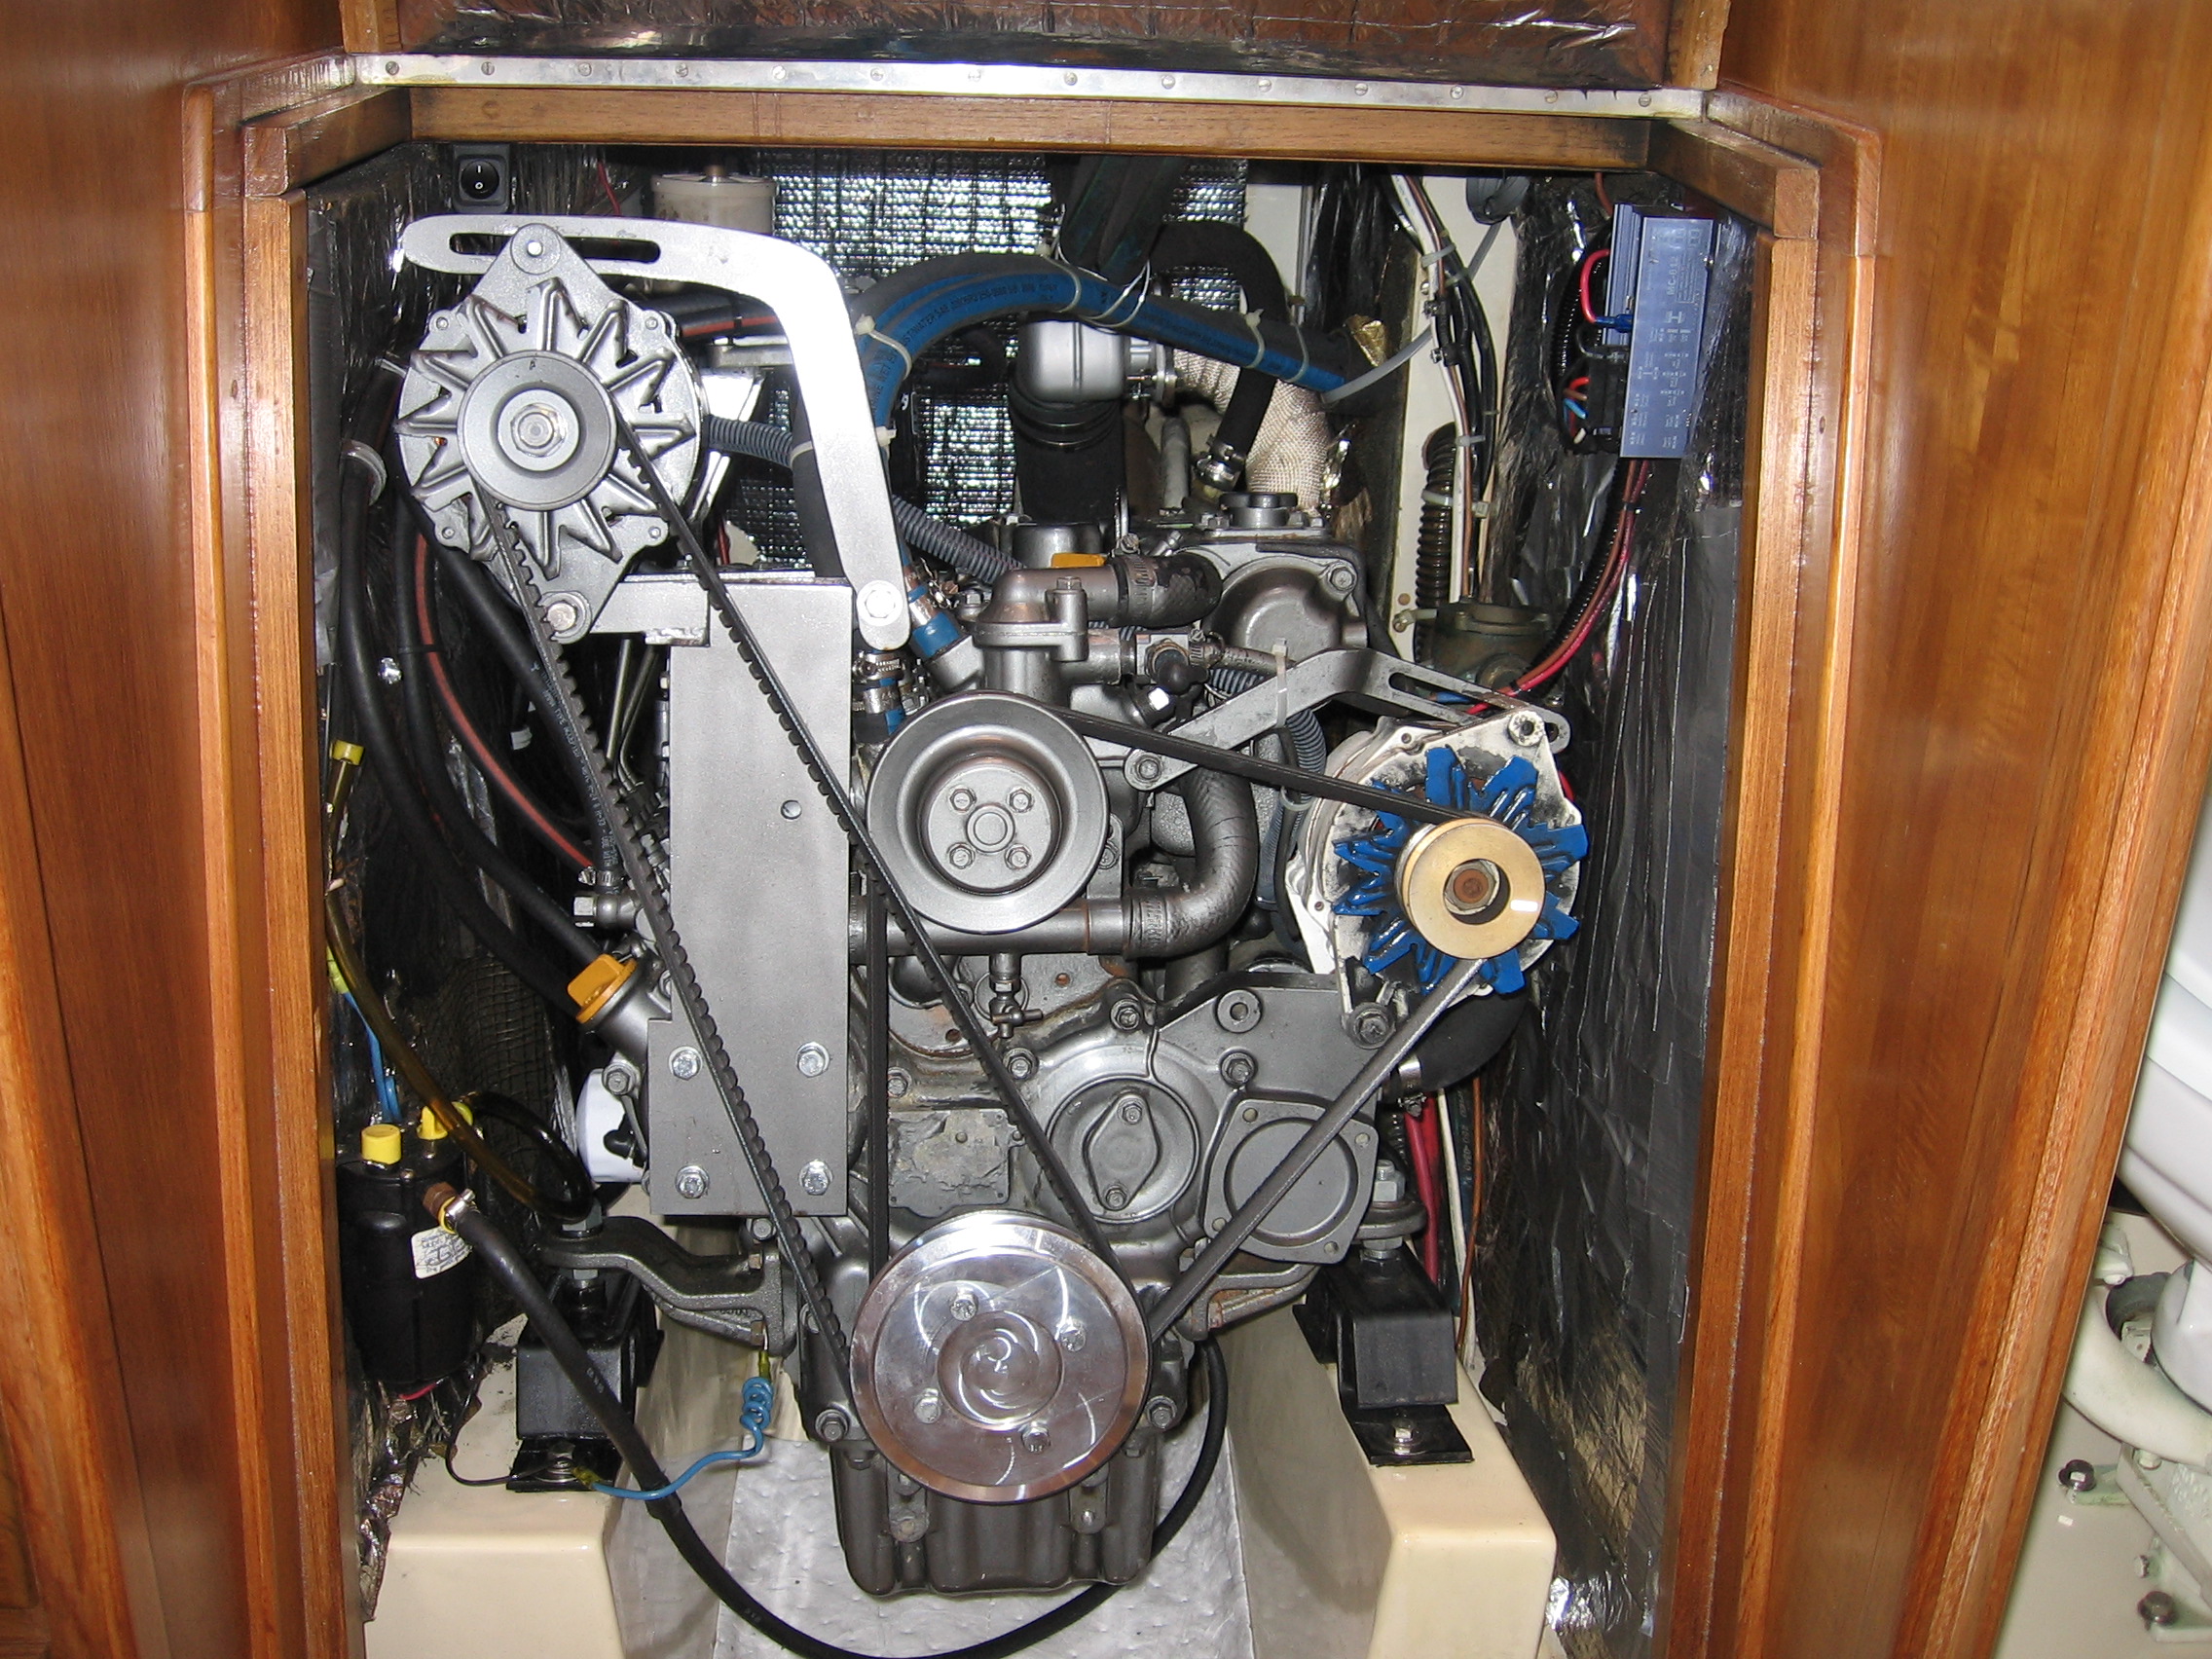
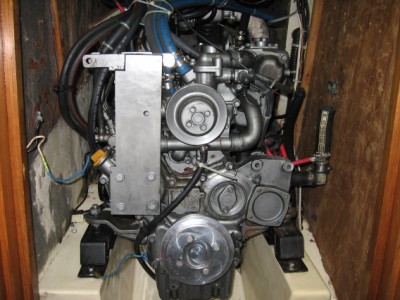
While this work was being performed Mike discovered a leaking freeze plug in the heat exchanger/exhaust manifold. Although a replacement plug was possible there was substantial corrosion around the plug which lessened the likelihood of a successful long term fix. We were surprised at the relatively low price for a new heat exchanger/exhaust manifold so we went ahead and installed a new one. We also took the opportunity while the engine was out to replace our muffler and also paint our engine compartment.
Here's a picture of the finished product:
 |
| Prop Shaft Generator |
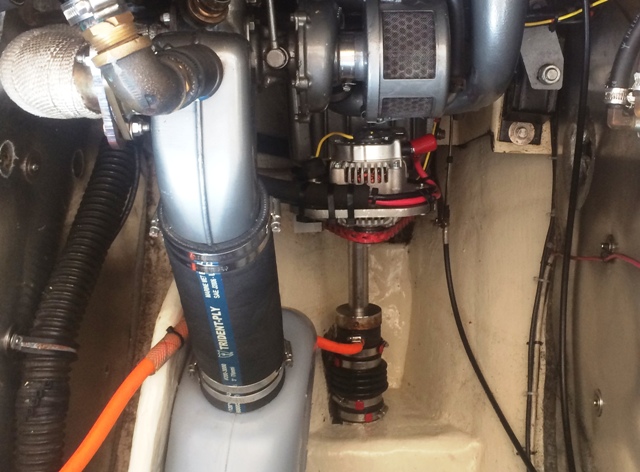
| We often wished during our trip that we had a shaft generator for our power needs during our long passages. Our solar panels were often shaded by the sails and since much of our sailing was downwind our wind generator suffered from the apparent wind effect requiring 20 knots true to produce meaningful power. Additionally, Amy and I both like our data so we were always conflicted by the power needs of our chartplotter, navigational instruments, and radar. In addition to our normal electrical needs for refrigeration, watermaking, lighting, computers, etc., the 24/7 nature of navigational electronics during passages often required us to run our engine every several days to generate power. So, upon our return we began researching in earnest with Jay at Merri Mar what our options might be for shaft generator. Our average sailing speed for our entire circumnavigation, some 28,000 miles, was just about 6 knots. At 6 knots our shaft spins at just about 300 rpm's. We installed the largest pulley possible, almost 7 inches in diameter, on our shaft coupling. An alternator housing was fabricated for the top of our transmission's bell housing. The alternator's pulley had a diameter of 1.5". These two pulley's resulted in a 4.67 : 1 reduction ratio which would convert our 300 shaft rpm's to 1400 alternator rpms. Jay selected a small, lightweight alternator used for small race cars whose output curve implied that we should get between 6-10 amps at 1400 rpms. In the spirit of keeping it simple we selected the internally regulated and self exciting model. Our first trial under power showed great results right in line with our 6-10 amp expectations. Under sail at 300-500 shaft rpms we had very different results. We barely reached 4 amps at 500 shaft rpms. Jay thought that perhaps the continually fluctuating rpms under sail might be the culprit in contrast with the constant rpms under power. We then installed the externally regulated model of the same alternator whose regulator provides field current. The results have been much better, although they still suffer from the impact of riding up and down waves especially sailing downwind. When we are on a beam reach without big seas we get a fairly consistent 5-6 amps of power when we are moving 6-7 knots through the water. When we are sailing downwind in a sea, as is most of our passagemaking, we get more fluctuation. Sailing downwind in 15-20 knots true wind, our boat speed through the water varies widely as we ride up and down the waves. Down a wave we get 6-8+ amps, while riding up a wave we see 1-4 amps. Sitting astride the shaft and measuring the amperage output as it varies up and down I would say that the overall average is probably about 4-5 amps. I was hoping for a consistent 6 amps at 6-7 knots but with our current output we are at least covering our refrigeration useage which is definitely a plus. Our solar and wind are not sufficient to cover 100% of our remaining house and navigational draw. We will use our engine every third day or so on passage to keep us below a 20% discharged battery level. The good news about the fabrication of the alternator housing and the shaft pulley is that we have not experienced any noticeable vibration or annoying sounds from the free wheeling shaft driving the alternator....a product of great work by Merri Mar, new engine mounts, a new cutlass bearing, and a well aligned shaft. Here's a picture of the alternator mounted in its housing atop the transmission. The yellow wire leads from the alternator to the regulator providing the field current. Stay tuned for our next results. |
|
|
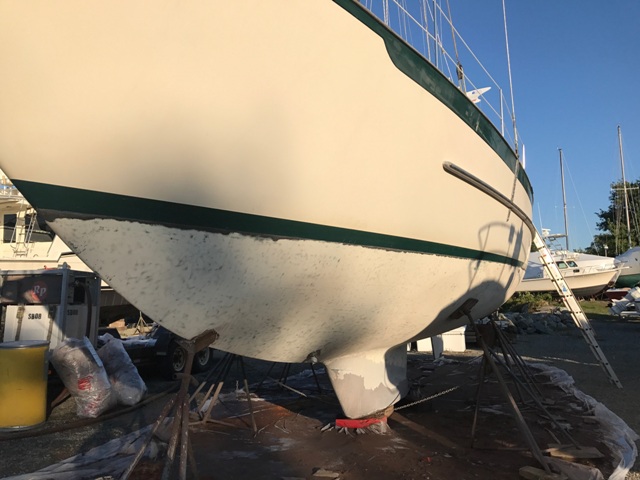
New Barrier Coat
In the Spring of
2017 as we were preparing for our cruise to Nova Scotia I continued to notice
that after
21 years, the bottom paint was not adhering as well as it should..
This had been the case with our last haulout in Singapore in 2014 and it was
getting worse. We decided to not bother painting the bottom and upon our return
in August from Nova Scotia when the engine work was being done, we would haul Shango and have the
bottom sand blasted and barrier coated. Here's a picture of the bottom post-sand
blasting and before barrier coating and painting. Although I would not know,
everyone in the yard who would, thought that Shango's bottom was in very good
shape and should be fine for another 20 years after her new barrier coat!
Parenthetically, on our passage south after the bottom project was complete,
there was a noticeable increase in boat speed when compared to the improvement
normally noticed after a normal bottom painting. There is a reason after all for
go fast boats to keep their bottoms as smooth and clean as possible!
 |
Misc. Other Projects
In no particular order here are the other noteworthy repairs/refits/and upgrades that we did during the two years we were home in Newburyport.
New Xantrex replacement Charger/Inverter
New Bomar replacement deck hatches for the V Berth and Salon
4th reef built into mainsail for extra heavy going
New Groco head
Rebedded quarter berth water tank cover
New antennae for WIRIE wifi system
New Davis replacement radar reflector
Installed NEMA 2000 backbone for our electronics and completed the conversion
from B&G to Furuno for all our instrumentation
3 New 8D Full River AGM batteries totalling 780 AHs
Repairs to our SGC Powertalk SSB radio.
Reupholstered our original Salon cushions
Replaced our original bimini, dodger, and enclosure panels
It was a busy and expensive 2 years of projects. After 21 years of cruising and a circumnavigation, Shango is probably in her best shape ever and looking forward to her 2017-2018 trip south.
Pre Circumnavigation Upgrades 2006-2010
Expanded Solar Array
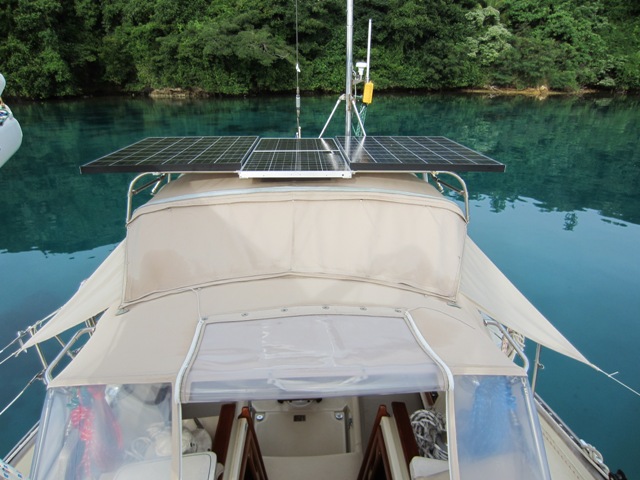
Our experience with Solar has been so positive that we added these two 185 watt panels to our existing array and brought our total capacity to 500 watts. This capacity meets our daily needs quite well.
We again went with Kyocera panels and a larger Blue Sky controller for this second array based upon our good experience to date with the first array.
For all those sailing purists out there we are aware that viewing our main's trim is made somewhat more difficult by this arrangement! Our current priorities now favor power generation and shade.
New Sails and Stackpack
 |
 |
|
|
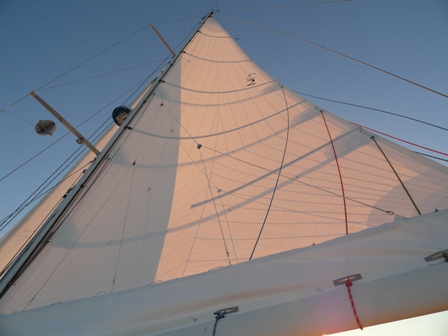
Main |
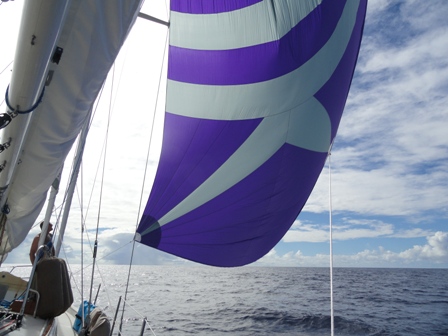
Asymmetrical |
|
|
|
 |
|
|
Stack Pack |
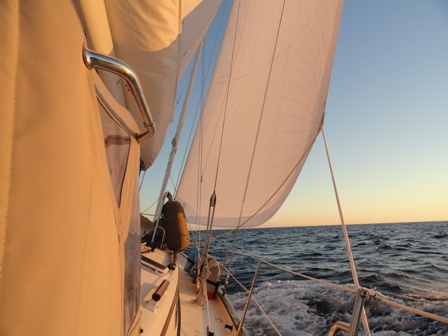
135 Genoa |
|
As of 2010, Shango was much in need of new sails. We were given several recommendations for local sail makers and after lengthy conversations with each, we chose Downs Sails. Roy Downs and his partner Sven were a joy to work with. Beginning in January 2010, while we were in the Caribbean, we conversed via email to settle on the right sails for Shango. After much back and forth we decided against an in boom sailing system despite the fact that Sven had had such a system for 7 years and it had worked well for him. Our original intention had been to go with a Leisure Furl system. However, whenever we saw a boat in the Caribbean during 2009-2010 with a Leisure Furl, we went over and asked about the system. With only one exception out of 12, everyone said that they were happy but they had had a major learning curve to get things right. Some actually spoke in terms of years to get everything right. With the size of our project list and the shortness of time, we decided that it would not be prudent to install a Leisure Furl and immediately embark on our trip with no time for this learning curve. As it was, we had 5 days from sail install to departure.
We chose a German fabric for our sails called Hydranet which is a woven material comprised of Spectra and Dacron. The Spectra gives the cloth great strength and durability. The fact that it is woven avoids delamination problems experienced by earlier Spectra and Spectra like laminated sails. Both Roy and Sven were very high on the material. Sven's 7 year old Leisure Furl is made from Hydranet. We chose a 135 genoa to give Shango some needed power. The original 115-120 was clearly too small for Shango's cruising weight. The rationale for the larger genoa was that the Hydranet, unlike Shango's old sails, would be able to hold it's shape while furled to the point that the Staysail takes over. If this turns out to be true it will allow us to take advantage of the larger genoa size in lighter wind and off wind conditions. So far in close reaching up to 25 true the furled genoa has maintained its shape and performed well. As of May 2011 we have not yet had to beat into anything stronger to find out at what point continued furling starts to impede performance.
On all points of sail it is a joy to look up at the main. We actually have a sail that responds to traveller, sheet, outhaul, and halyard changes. New sails are always a great joy. Hopefully the Hydranet will prolong this experience.
Although Stackpacks and Lazyjacks are never a visual success, we really wanted the convenience they offer. Roy did all he could do to correctly size and configure our Stackpack and Lazyjacks to limit the visual sacrifice. He also made several adaptions to fit our cruising plans. Since zippers always fail, Roy installed a traditional hook and loop closure system for the top of the stackpack rather than a zipper. Each side of the Stackpack can be rolled up on it's supporting batten and be affixed to the base of the sail, to as Roy says, get the damn things out of the way when on passage. We found this feature to be very worthwhile on our Marquesas passage. In addition, each side of the Stackpack can also be removed from the sail via a concealed zipper to make sail repairs and removal far easier than when they are sewed onto the sail.
We had an Asymetrical on Great Notions and wanted one for the lighter air
sections of our passages. Erin Brie, a Valiant 50, reported using there's for 5+ days
while crossing
the Atlantic to the Caribbean. We have used ours on almost all our passages in
light air. In 6 knots apparent we can move at 4 knots on a 120+ degree broad reach.
With wind up to 15 apparent we fly. The speed is good but there are
several significant drawbacks. As noted in the Monitor documentation, the
windvane has a very hard time steering the boat when under asymetrical or
traditional spinnaker. This requires the use of the autopilot and thus
electrical use increases. The use of the autopilot and its resultant noise,
makes it hard for me to sleep on passage in the quarter berth. There is some
effort to get the sail up and down and stowed which is contrary to our inherent
interest in avoiding work. Asymetrical Law #1 states that whenever you deploy
the sail in 6 knots apparent the wind will increase to 15+ within an hour thus
creating all kinds of scurrying about. And finally, the sail takes up a fair bit
of always precious stowage space. As of May 2011we must say that the jury is
still out on the Purple Monster's role on Shango. Now, as of 12/2013 the
jury has returned. Having mastered our poling techniques, the Asymetrical's only
modest improvement in speed over a poled out genoa is far outweighed by its more
difficult handling and its storage space requirements. An Asymetrical will be a
fun sail for day sailing when we return, but, we would have rather had the extra
storage space on this trip. Perhaps on a larger boat our thinking would be
different.
That's the sail story. Sorry for the wordiness, but we are a sailboat after all...
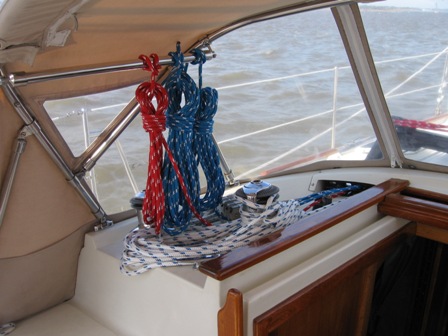
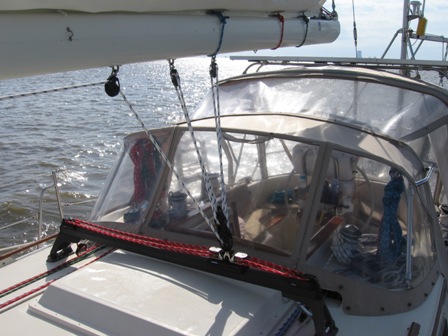
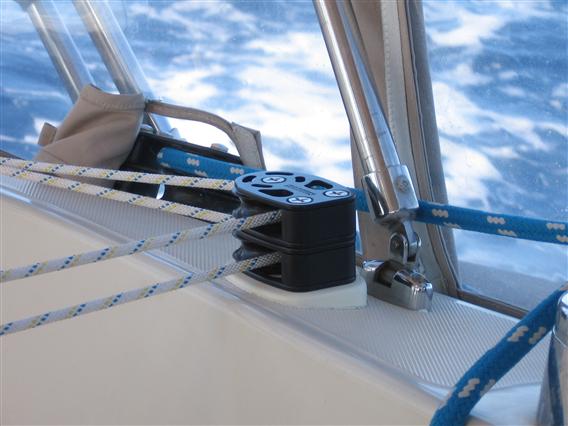
All Sail Control Lines Lead Back to Cockpit and Electrified Main Halyard Winch
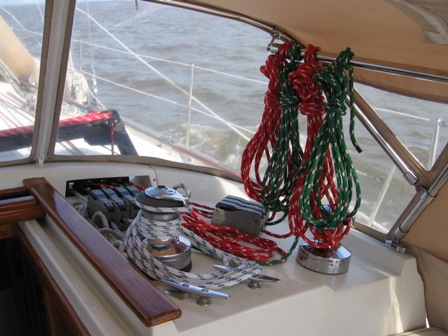
This is a big change for us. However, on our 2009 Caribbean trip, we were convinced to
give this approach a try. Reefing, unreefing, raising, and lowering the main at
all hours and in all conditions becomes a real workout if you try to
sail as much as possible and are not always in the same wind and
sea conditions. So, we started by electrifing the winch shown at right above and
brought the main halyard back to it. With the existing rope clutches and
controls we now have all three sets of reef outhauls and downhauls, the boom
vang, the topping lift, the staysail sheets, the traveller, and the main sheet
led back to the cockpit. There is a big learning curve with this approach to get
the right technique and teamwork to make
things work. It is too soon to draw any conclusions but despite the eventual
outcome we know for certain that we will never go back to a non-electrified main
halyard winch at the mast. There is however a lot of spaghetti in the cockpit so the
jury is still out. We did have straps and rings attached at our downhaul luff
grommets so if the in-cockpit approach becomes too cumbersome we can at least go
back to reef downhauls at the mast.
After several passages we now are becoming real fans of in cockpit reefing. The cockpit spaghetti is easily overlooked when one has to reef at 2am by yourself. Reefing is now a several minute solo job that can be done with safety and ease without having to get attached to jacklines and ride the bucking bronco at the mast, in the dark, and the howling wind. Very, very nice. One benefit also brought home over the Leisure Furl approach is the ability to reef going downwind. When you are running off the wind in strong winds and seas and you want to reduce sail, the Leisure Furl requires heading into the wind and seas to reef. No fun. Given the pain of heading into the wind in these conditions I might be tempted to avoid reefing. Not so with this more traditional approach. We went from a single reef to a double reef in just these conditions off Great Inagua and had a first hand experience of the benefits of avoiding heading into the wind and seas to reef. Worth putting up with all the in cockpit spaghetti, at least when we are in passage mode.
December 2013 update. We are now more than half way around the world and have drawn a somewhat different conclusion. The electric winch and the in cockpit outhaul reefing lines are definitely keepers in our book. We have gone back to traditional downhaul reefing lines at the mast. The spaghetti did become too much of a hassle for us in the cockpit and more importantly no matter how hard we tried, we were always getting the downhaul lines snagged and without good visibility from the cockpit we actually ripped the sail in several places along the luff. I now go to the mast for downhaul reefing. I have far better control of the process and have just learned to live with the accompanying wind and rain. That's our conclusion but every couple has different techniques that work for them.
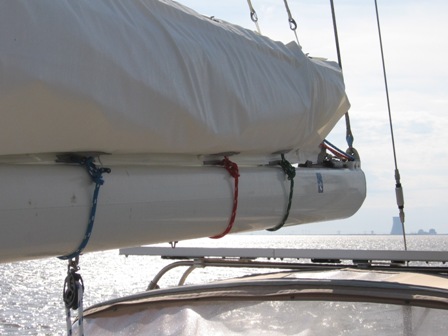
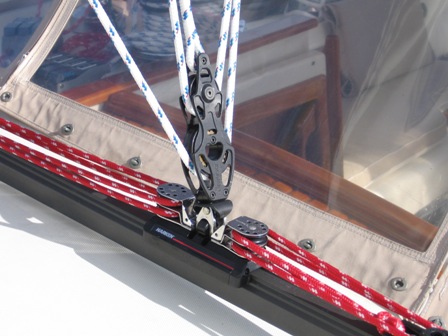
At last we have access to all three reef lines. The standard PS 40 Forespar boom did not have enough aft boom sheaves for 3 reefing outhaul lines and the main's outhaul. Jay at Merri-Mar rebuilt our sheave box to add a fourth sheave. Previously, before an offshore passage we were always trying to decide which two reefs to tie in. Sometimes we guessed wrong...
New Traveller Cars, Blocks and Main Sheet Control Blocks
Shango's original gear had done yeoman's duty and it was time for upgrading the original gear. Although I was not too bothered by the friction of the old gear, as Kevin from North East Rigging said, "Not everyone is 6' 4" tall and weighs 230 pounds. Amy might appreciate the upgrade." Kevin was right.
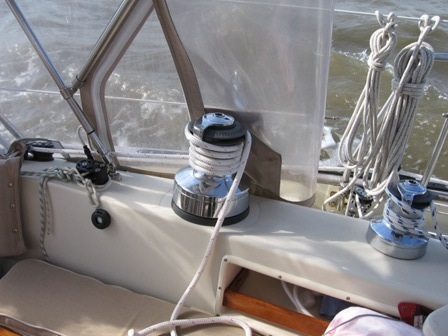
Electrified Genoa Winches
The expense was shocking but I must say worth every penny. What an amazing
difference in sail handling especially with our larger
135 genoa. Amy was not able to even turn the old single speed winches when they were fully
loaded. We were always envious of our friend
Chace on Windaway who had
electric winches. For us an additional benefit is that in cooler climates and
rainy weather we always
have our glass enclosure sides in. When they are in you
can not get a full turn on the winch because of the glass sides. Now it is not
an issue. I'm such a fan of the winches that I joke about electrifying
the furler winch when we get to New Zealand! I guess it's easy to be a fan at first,
let's just make sure they are as dependable and fool proof as the original model.
Fortunately if they do fail, we have not thrown out our old winch handles
Pulpit Extension for Asymetrical Spinnaker
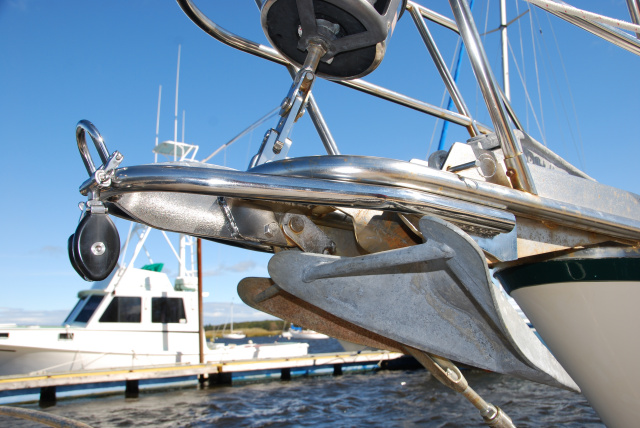 |
We are anticipating a lot of off-wind sailing, some undoubtedly in light air. We therefore decided to add an Asymetrical Spinnaker to Shango's inventory. Windaway had told us that placing the tack line at the genoa tang caused the line to whack the navigation light. We also wanted to find a way to push the tack of the sail as far forward as possible to maximize the sail's utility as the down wind angle increased. The anchor platform works so well that we also did not want to give up any space to a telescoping pole tube nor did we want to somehow attach the pole tube to the topsides. Roy, Sven, and I talked about options and came up with the idea of fabricating a pulpit extension just long enough to get the tack line out beyond the top of the pulpit and the bow light. I went back to Jay Jay at Merri-Mar with the idea and he fabricated the extension at right that is all one piece and bolts onto the pin used for the anchor roller. By bolting it onto the roller we could remove the extension as required. I am really looking forward to seeing how it works. I hope that I have not offended any PS 40 purists and I also wonder what Bill Crealock would think of this modification to his design! So far on our only two uses of the asymetrical, the extension has worked as planned.
New and Beefier Bale for Preventer
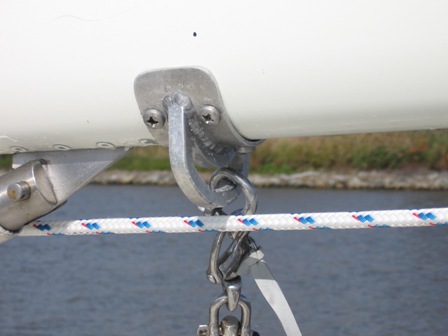
We use our preventer all the time. Not only do we use it for off wind protection but also for boom control when motoring, stopping boom motion at anchor, and for immobilizing the boom when we are closing up the stack pack. Our old preventer used a small D ring on the boom formally used for a main sheet block. I was always a little nervous about it's strength. Jay Jay made the bale at left to reduce my worries about any attachment failures.
New Prop and Spurs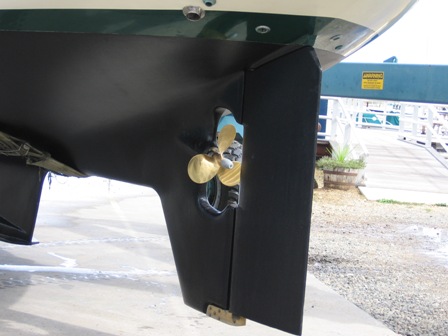
In keeping with our strategy to keep things strong, reliable, and if at all
possible, fixable by
us, we decided to replace our Max Prop with
a fixed 3 bladed 18" diameter 14" pitch Michigan prop with line cutting spurs. Our Max Prop performed
well but had several drawbacks. We really wanted line cutting spurs to avoid
going overboard at all hours to clear a fouled prop. Shango's skeg and shaft
configuration and the length of the Max Prop hub did not leave enough
space for spurs. In addition, I couldn't get zincs on the Max Prop to last more
than 4-6 months. Also, replacing or repairing a Max Prop requires hauling the
boat. And finally, the last straw came when I removed the Max Prop in
preparation for its being sent to California for reconditioning. As I was
removing the blade from the shaft, I discovered that all that was holding the
prop onto the shaft was the shaft key. The locking nut had come loose! I felt
very vulnerable to unseen problems.
I am interested to find that our engine can now attain its full 3600 RPM with
our new 18" diamater 14" pitch fixed prop. With the Max Prop 18" diameter 13"
pitch
prop we could only attain 3450 RPM. The Yanmar very much appreciate this and I
think as a result we also no longer have soot marks on the hull from an
overworked engine . So, in
addition to allowing the engine to reach its full rpm while maintaining good
motoring performance we now have a prop that is easily replaced, has spurs, and
does not require greasing or all too frequent zinc
changes. Max Prop proponents might say that we've given up a fraction of a knot of sailing speed and
perhaps some backing down performance but on
balance I am comfortable with the trade-offs for this trip. Given how loaded
down Shango is for this trip, especially in the chain locker, I'm not sure that
a more hydrodynamic prop could do anything to improve sailing speed
Larger Chain and Anchor

We have always had a 45 pound CQR with 275 feet of 5/16 chain as our primary
anchor. Given our plans we wanted to be as safe as possible especially when deep
anchorages do not allow for 5 or 6 to one scope. So, we bit the bullet and went
with a new 60 pound CQR with 275 feet of 3/8 inch chain for our primary. We
converted our 45 pound CQR to our secondary and to have at least some
consideration for Shango's bow weight, we went with 50 feet of 5/16 chain and
200 feet of 3/4 inch nylon triple braid for the secondary.
Although some people like different anchors for different conditions, we have always liked the CQR. We tried a Delta for a while but never saw a big difference and it did not ride well in the PS 40 rollers. The two CQR's fit very snugly together with no banging around in a swinging anchorage.
Many say that the Racnor is the best choice available today. Before our circumnavigation we were warned that the CQR would not set fast enough when trying to set in small sand targets amid coral fields. In 6 weeks of anchoring in the Tuamotus coral fields, we certainly became aware of the need to set quickly in small sand targets. Despite all the warnings, we became pretty good at finding sand targets, quickly releasing enough chain to hit the sand patch and then slowly releasing and setting more chain as we fell back. I'm sure the Racnor is a great anchor, and maybe an enhancement upon the CQR, but for now we're staying with the CQR until she lets us down.
Replacement Rigging
After 14 years it was time for Shango to have replacement rigging. It was a
good thing since the rigging inspection revealed two severed strands of wire in
our backstay probably due to the lightning strike that fried some of our
electronics several years ago.
The estimate was very reasonable so we also replaced all the turnbuckles and
Norseman Fittings, probably overkill, but in keeping with our goal of being on
the safe side.
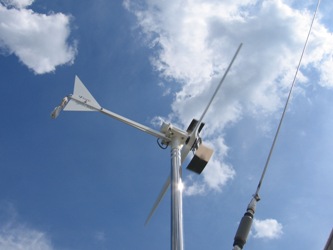
New Solar Panels and Replacement Wind Generator
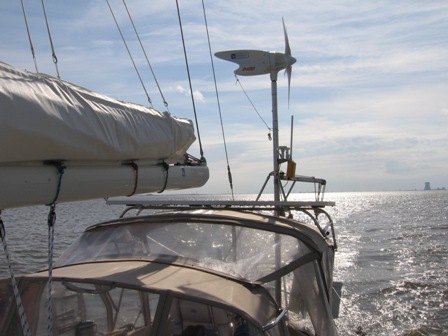
Our Ferris Wind Generator gave us nothing but problems on our last trip to the Bahamas/Caribbean. After a lot of research and talking with other cruisers, we replaced the Ferris with a D-400. So far it is wonderful. Quiet and next to no vibration. It takes a while to really understand a machine's output but so far it seems to be comparable to the Ferris without the noise, vibration, and most importantly the terrible customer support.
We also added 3, 65 watt solar panels mounted above the Bimini aft of the
boom. Again, it is too soon to draw any conclusions especially in the Fall on
the Northeast coast, but so far I am very happy. We have seen a high of 14.4 amps
and seem to average at least 5-7 amps as soon as 9 AM and as late as 4 PM with
10-14 amps during the 10AM to 2PM time period. The Blue Sky Controller is also reporting that it
is boosting the output by it's claimed 20-25%, although it's their calculation!
It is also doing it's job of regulating the output when the battery is
fully charged. So far I am impressed by the Kyocera panels and Blue Sky
Controller.
As of 11/11 we could not be happier with the D-400. May well be the best marine
wind generator. We are also complete solar fans as well. We are trying to find a
way to double/triple our capacity by using 24 volt panels. Stay tuned.
Well, you never know what's next with cruising...A completed unexpected cyclone disturbance in Tonga gave us 70+ knots one morning at 6am in February 2012. The wind generator was not tied down and I was not about to brake it or tie it down myself. One, then all the blades flew off....given our experience with our expanded solar array , see above entry,we have not yet felt the necessity to replace the blades. Despite the cyclone incident we are still huge D-400 fans. The manual cautions its use above 50 knots. We were fine until 70+ knots.
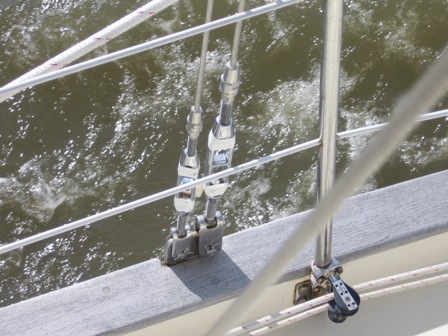
Iridium Docking Station
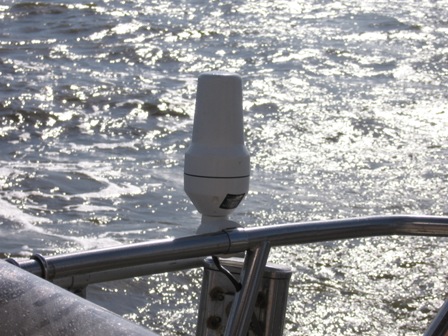
We have been going back and forth on using our Satellite phone to connect to the internet for GRIB files or buying a Pactor modem and using our SSB. We had heard such good things about the compatability of OCENS Weather Net with Iridium that we decided to go this route and avoid the hassles of bad propagation with our SSB. I installed the fixed antennae on the stern rail connected it to the docking station and in turn our PC. The results are as advertised. On demand access to all the OCENS weather data you want, any time, anywhere. The phone access time seems to be consistently under a minute from authorization to download completion. This approach is certainly not free, but when wifi is not available for GRIB files, it is an excellent option.

Here's the phone docking station for the Iridium phone.
Furuno Navnet 3 Chartplotter and Maxsea Laptop Navigation Software
We have been very late adopters of any form of chartplotter technology, boat or car. For our 2009-10 trip to the Caribbean we finally broke down and bought Nobeltec's laptop software. We now know why the rest of the world uses this technology! Although we loved Nobeltec, it is not compatable with Furuno so we went with Maxsea software on the laptop so we could share charts between the two and also have access to radar on the laptop. We also were able to interface all our B&G instrumentation and autopilot with Navnet3 and Maxsea. We are very happy so far. Many people feel that Garmin's chartplotter may be more user friendly than Navnet3 but my research showed that Furuno still has the best radar and Garmin seemed to have limited chart availability outside the US.
This install definitely goes against the strategy of going with tools and upgrades that we can fix ourselves. However we do love the information and if electronic gremlins do strike, Amy bought reduced size copy charts from Bellingham Charts to get us from Panama to New Zealand so we can always go back to paper as we have always done until just last year.
Update as of December 2013. We are still very big fans of the Navnet3/MaxSea solution. One important note footnote however. Many areas in the Pacific and Indonesia have had very poor electronic charting. For most of the last two years our electronic charts are mostly useless for close to shore use. The use of GE2KAP (navigational charts you make from Google Earth images) have been a life saver. Before every new destination when we still have internet, Amy makes charts for all the areas we may be going to. Unfortunately neither MaxSea Time Zero on the laptop or Navnet3 at the helm accepts this form of charting. Therefore we make our charts, read them on OpenCPN ( wonderful and free navigational software), make our waypoints and routes on OpenCPN, export the waypoints and routes using the .GPX.file format to MaxSea Time Zero, and then export the waypoints and routes from MaxSea to NavNet3 at the helm. Sounds like a lot of work but the networking between MaxSea and NavNet makes the exporting just a point and click on the laptop. With the accurate routes and waypoints generated from Google Earth, we have become very accustomed and comfortable with sailing toward waypoints on routes that pass 1-3 miles inland when looking at our progress on our erroneous Navionics or CMap electronic charts. This is a long winded way of saying that if you are going to places that do not have accurate electronic charts, and you enjoy electronic charting in addition to paper back-up, make sure you have charting software that will accept .gpx file formats.
Fuel Polishing System and Additional Fuel Tankage
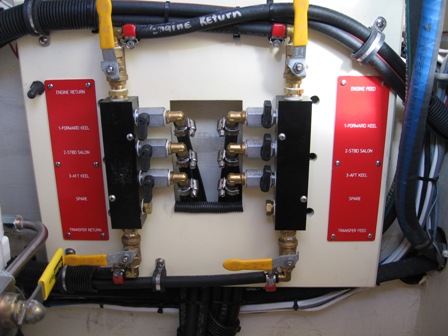
Our last trip brought us two fuel related experiences. First, we now feel that
you can never have too much fuel. We had 6 days of absolutely no wind on our way
from Norfolk to the BVI. With limited fuel we had no choice but to take our
sails down and wait the six days for wind to arrive. So, we converted one of three water tanks to fuel
and gave up some storage space to expand our smaller 20 gallon fuel tank to 60
gallons. Our current configuration is now tanks of 72, 60, and 35 gallons
totaling 167 gallons - a major increase from our original 92. The Pacific Ocean
is very big and can be quiet calm so the more fuel we have the more options become available to us.
Second, it is one thing to have fuel it is another thing to have access to it. In May 2010 on our way from the Bahamas to Norfolk, the pick up on our full 72 gallon tank became hopelessly clogged. We had no way of easily transferring fuel from this full tank to our smaller 20 gallon tank as it became depleted without making an absolute mess in a rolling sea. So, we installed the fuel polishing system at the left which enables us to both clean and transfer fuel between tanks or within the same tank. The transfer pump should be strong enough to overcome any clogged pick up and if it is not, we also added spare access points to attach our air compressor for an additional clot busting option.
In Indonesia we were forced on occasion to use incredibly dirty fuel. Despite filtering it on the way into the tanks, we also polished it again immediately after re-fueling, and again every month thereafter. So far.... knock on wood.....we have not experienced a fuel issue.
I know that many reading of this approach may be amazed by our love affair and over reliance on the iron genny, but, as our friend Skip Hird says...."go with whatever floats your own boat."
Dual Racor Filters

Since we put our existing Racor filter to use in the transfer and polishing system we installed a new dual Racor system for our engine which allows for rapid transfer to a clean filter if, despite our best efforts above, we do experience a blocked filter.
Wind Generator (first and failed attempt)
One of our biggest frustrations during our 2001 trip was the constant
use of the engine
for power generation. We always envied others who could sit at anchor for
days
and power their house banks with either solar panels and/or a wind generator.
Friends
on Yaquina from Portland Oregon had an array of solar panels on their bimini
which
worked great for them. We are still thinking of this option but I was reluctant
to
tackle the engineering task of bimini penetrations and support. We already had a
stout 2.5" diameter wind generator mast on the stern so wind became our first
choice. Shango came with an Aerogen 6 wind generator which we found to be
nearly useless. At 15-20 knots we barely made 2-3 amps. At survey I was very
suspicious of its performance and had the local Seattle dealer check it out. He
returned the verdict that it was fine. Although I knew something was fishy I did
not
pursue it at that time
As far as I could tell, the English company that made the unit no longer exists and the support email addresses all went to dead ends. After tracking down the unit's actual designer, we still could not get the unit to perform as expected. It became time to pursue other options Other friends on Eleanor M. from Newburyport, MA have had a Ferris 200 rig mounted unit for years which they are very satisfied with. Other friends had Kiss and Four Winds units with which they were also satisfied. Although all three units appear to be excellent options, I went with Ferris given the fact that they were based in Massachusetts and would be more accessible for support.
The unit is now installed and although I've had to track down some initial installation bugs related to wiring and also with the regulator it is really able to generate the amps as advertised. I'm still gaining experience with the unit but so far it does start generating power at 5-7 knots of wind, 1 amp at most, and at 12-15 knots it consistently puts out 5-7 amps. At 15 and above the output really ramps up. We see 10 -18amps between 15-20 knots. In Cape May as a cold front passed through one afternoon we had gusts up to 28 and the unit's amp meter maxed out its recording scale at 25 amps......That's the power side....noise and vibration is another story. Needless to say the Aerogen never put much stress on its mounting mast and supporting struts.The Ferris does. I've started to investigate solutions with some luck to date. First, after initial settling in, I had to further tighten down the set screws securing the unit to the mast. That helped ease the vibration greatly. Secondly I am finding that as usual my height is causing problems. I had four inches added to the base of the mast given the increased radius of the Ferris's blades. This increase in height as well as the height of the mast in general is causing strong forces on the mast especially during wind changes. During the strong Cape May winds, I added kayak tie downs straps to supplement the two supporting struts and that also seems to work. I'll continue oogling solutions and look at other people's ideas as the trip continues. My first thought is that a radar arch for electronics and solar panels might also be a better solution for mounting the generator. More stiffness as well as a much shorter mast.
Well, 3 years later, including 2 years of Bahamian and Carribean my impressions are somewhat different. The unit is powerful. It can produce as much power as any unit that I've seen with perhaps one exception, the D 400. However, we have been plagued with brush failures and very expensive support. One of our brushes was not making complete contact. I called the company owner, Hamilton Ferris and was told that he would have to troubleshoot with me to find and fix the problem. He also said that I had two choices, pay him on an hourly basis for his time or pay a fixed fee of $200 for his time. I was flabbergasted given all the items that I had bought from his company. I had no choice being in Grenada so off we went and fixed the unit via $200 phone support. Several months later another problem surfaced. I described the symptoms to Ferris and he said that in all his 30 years in business he never seen the problem that I described and basically said that I was on my own. I had no choice but to perform major surgery on the unit myself......I eventually found that I had to resolder a failed main connection from the rotor. Access to the connection created problems with resealing the case to the unit so after describing my findings and asking for advice on resealing the case, I was basically told that wow, that's amazing but we have no advice on how to seal the case, again, you're on your on.
So, when the unit works it is powerful albeit far from vibration free if you use a pole and not a rigging mount. However in only three years of use I experienced two major failures and had to endure expensive and infuriating customer support.........not surprisingly we have purchased a new unit....a D400 so again, stay tuned for our next wind generator saga.
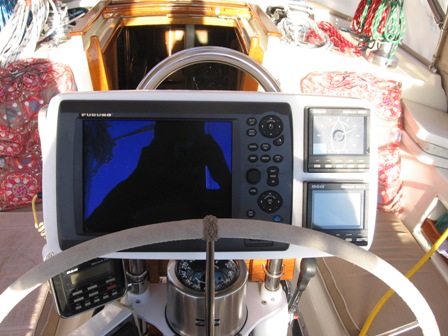
Helm Instrumentation
Amy and I both prefer having as much of our instrumentation duplicated at the
helm as
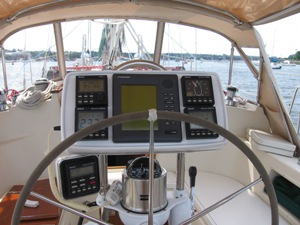
possible. Shango previously had some at the helm and some at the nav station.
Especially
bothersome to us was the use of a removable aluminum bracket for the radar
repeater
which when in use was so high that Amy's 5"2" view was obstructed. Additionally
there
was no remote radio MIC for VHF communication while at the helm. So, I looked
around
for a helm unit which could both hold all our displays but also be low enough in
profile so
that Amy could see over the unit while seated on the helmsman bench. The Navpod
Grand Prix on the right just about fits the bill. We did not have room for all
six of our
displays so we had to add an Edson display head at the lower left for our
autopilot. Buying
the unit was the easy part. Installation was a bear. I terminated all the wiring
under the
helm in three terminal boxes, made new connections for runs up the pedestal
guards, and
then fished all the new wire runs down the pedestals to the terminal boxes for
connection.
After numerous false steps, faulty soldering, impossible places to access, and
overloaded pedestal guards I finally completed the job.
For amateurs among us like me, I have a new found admiration for the clean,
efficient
and professional work provided by qualified marine electronics technicians. I
also have a new found appreciation
for the benefits of both wireless instruments as well as integrated display
platforms cutting down on the need for
separate displays for each device. Despite the installation headaches, the
Navpod has been great for us data freaks.
Bimini and Stack Pak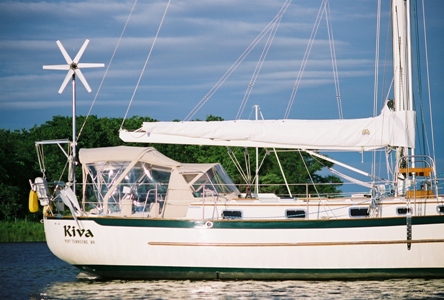
When we purchased Shango/Kiva her bimini and dodger were in pretty
bad shape and additionally they did not have side and back enclosures.
Another big lesson from the last trip was that Fall sailing down the East
Coast especially at night is COLD. Full enclosures were a must for us.
At right is a shot of the new bimini and enclosures. We are really happy
with this addition. Not only do we stay warm but as happened during
the 4th of July celebrations in Ptown, we can stay in the cockpit when
it rains.
The Doyle Stack Pack has eased the burden of sail covering. The
PSC 40 has a good sized full battened main and I wanted to make it
as easy as possible to cover and uncover. I'm still working out the best
system especially in wind and rolling seas. The bimini requires that the
boom be moved outboard in order to reach the zipper to close the
Stack Pak. In calm seas it's easy to just move the traveller or loosen
the mainsheet for access to the zipper. When it is rocking and rolling
that would be a good way to be knocked in the drink by the flying boom.
I've now found the right combination of deployed preventer, vang,
traveller, and mainsheet to pin the boom can to an
outboard position enabling me to stand on the toerail and reach up to the aft
end of the boom and start the zipper pull to enclose the sail. After I get the
zipper just aft of the dodger my circus act maneuver is over. In a rolling sea
this is definitely not as easy as 1,2,3 but on balance I think the Stack
Pak is a great addition.
Three years later and after two Bahamian/Carribean cruises, we still like the Stack Pack. All the zippers have had to be replaced due to UV and constant use issues but the unit is still doing it's job. We will be replacing it with a new Stack Pak this summer since we are getting new sails and the sailmaker has his own Stack Pack like design which will be zippered to the foot of the new sail.
New Battery Banks
The cranking battery was identified as being suspect at survey and I confirmed this during our first summer's cruising. The house bank was only 420 amps and I wanted at least 700 amps so I replaced both banks. I replaced the cranking battery with a Group 27 AGM. For the house bank I was able to fit 3 8D AGM totalling 735 amps. In addition I fabricated aluminum tie down bars and fiberglass angle irons to hold all four batteries securely in place. The picture below shows the cranking battery to the right and one of the three 8Ds to the left. The other two 8ds are perpendicular to the 8d and run under the cockpit sole under the galley sinks. These two also have aluminum tie downs and fiberglass angle irons securing them in place. Hopefully Shango will always be facing the sky but in the event she decides to turn turtle I think we have a good chance of avoiding being bombarded by flying batteries in addition to everything else that would be going haywire. At the top of the picture you can also see newly installed wind generator regulator and diode.
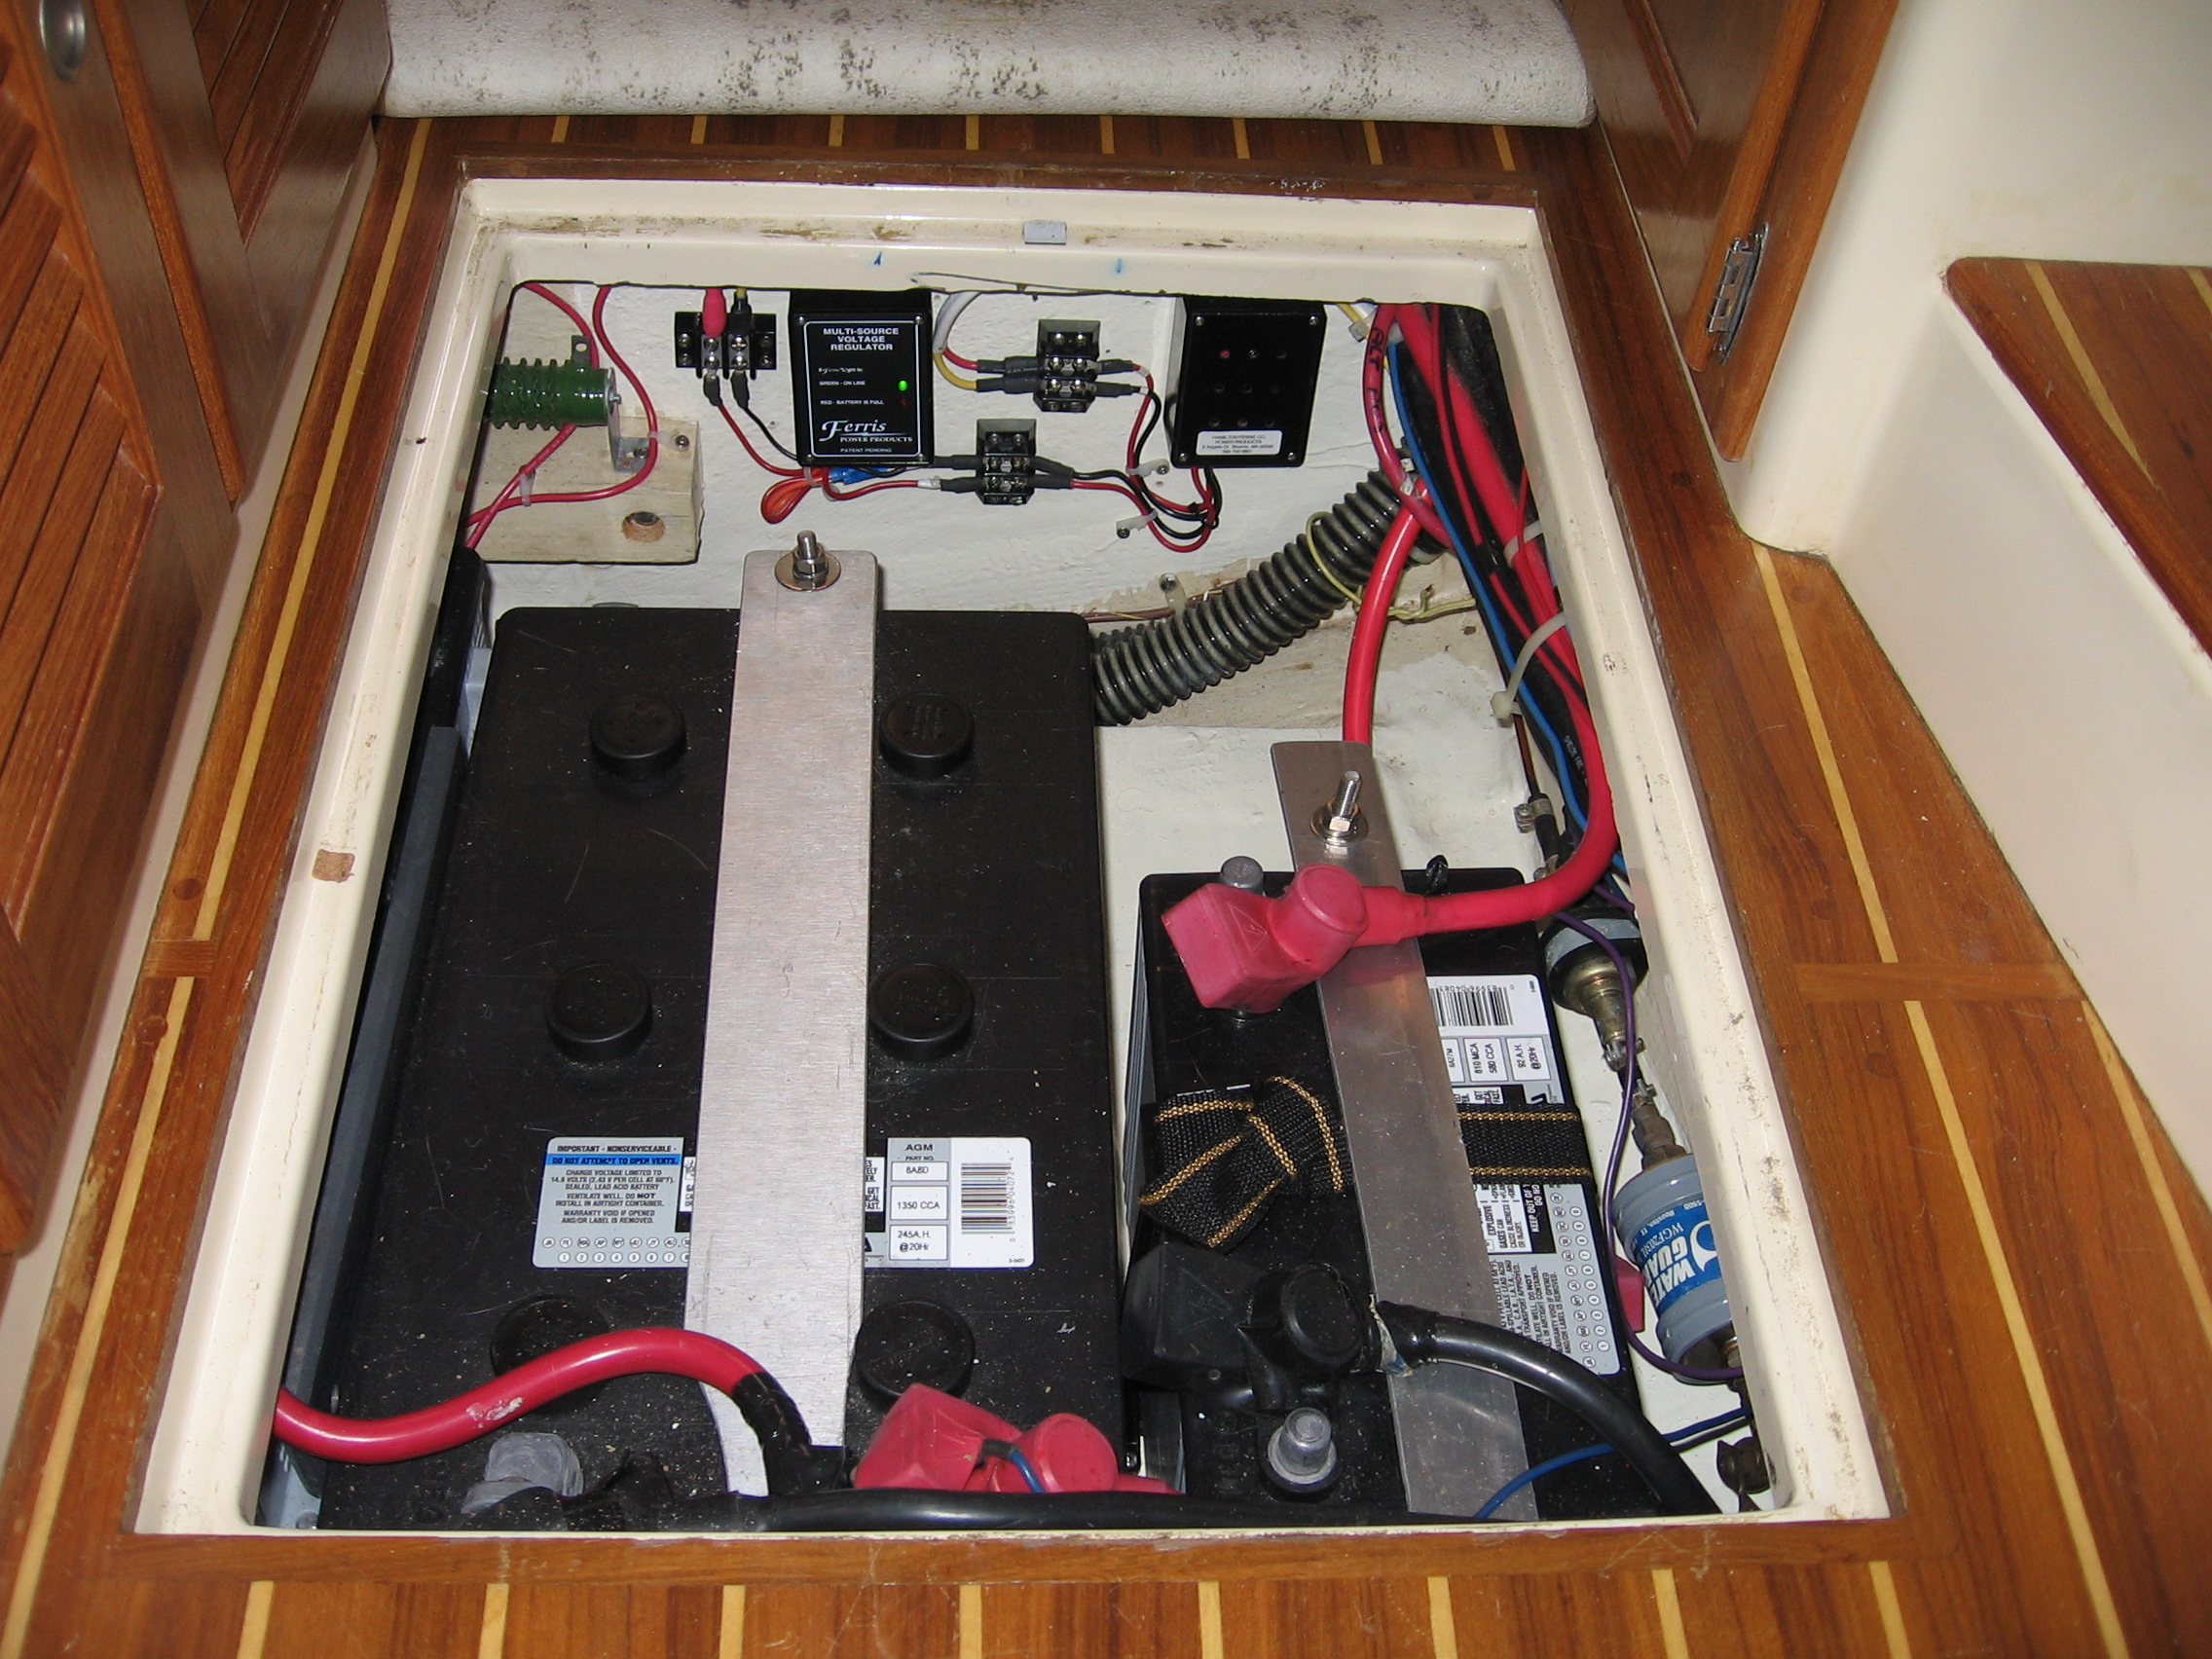
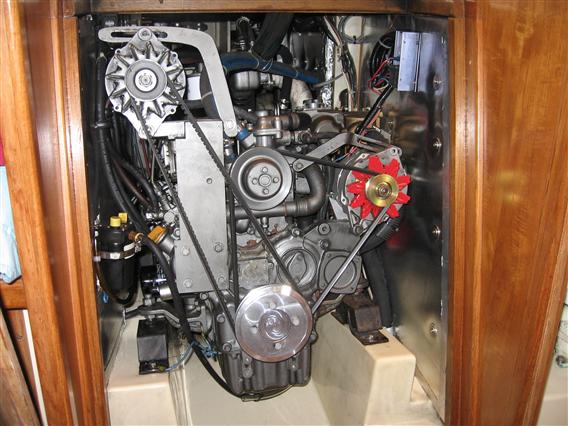
Dedicated Alternators for House Bank and Cranking Battery
Every resource that I consulted recommended dedicated alternators for both the house bank and the cranking battery. Shango came with the original and unused internally regulated Hitachi 80 amp alternator. In its place was a high output externally regulated alternator. At survey the external regulator was found to be misbehaving and I replaced it as soon as I got the boat back East. The new regulator in conjunction with the existing high output alternator have worked fine. The magicians at Merri-Mar custom made a second bracket ( shown below at left) for the Hitachi allowing me to install the unused Hitachi. We now have dedicated alternators for both the battery banks with each alternator specifically designed for its bank's needs. So far the system has worked like a charm with absolutely no intervention required. I've been monitoring voltages and amp hours for both banks religiously and so far everything is working as it should with no effort on my part. Best of all I can keep the battery switches isolated and avoid any unwanted run down of either battery bank.
Holding Tank Diverter Valve
Another issue discovered at survey was a very finicky and nearly inaccessible diverter valve for the holding tank. Every time we wanted to change the direction of head discharge, a nearly impossible contortion was first required under the head vanity to access the diverter valve handle and then as the handle was in reach, a super human effort was required to actually turn the handle. The valve and the handle were plastic so I of course was just waiting for it to break. During our trip, the handle did freeze in place so I was forced to jury rig our system so that all discharge was redirected directly overboard. Amy was outraged by this necessity but gave in to the compromise so as to avoid using a bucket. So, upon our return and having Shango safely hauled ashore, I decided to rebuild the holding tank plumbing system in a fashion more similar to the way it should have been in the first place. It is interesting to note that most PS 40 owners talk about this refit as the one they most dread as well as the one they most envy when when they see someone who has taken it on with success. Here's the finished product:
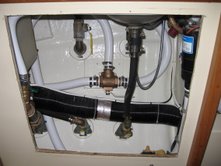
The above picture shows the space under the head sink with the casework all removed. The upper left corner of the picture shows just the edge of the holding tank, behind which is the old mounting plate for the now removed diverter valve. The new diverter valve, the bronze 3 way ball valve, is shown in the middle of the picture. The white sanitation hose coming into the top of the valve is from the head. The two hoses leading out horizontally are the lines going either to the holding tank or directly overboard. The new valve is up to its task unlike the previous one. Most importantly, with the casework in place the valve is still very accessible.
Am I glad that this project is done.
Engine Compartment Insulation Replacement:
I don't have a good picture of the engine compartment with the old insulation besides the one above , however, the insulation material was of very poor quality. The thin foil cover was full of tears and the foam insulation material itself disintegrated. This is a picture of the compartment free of the old material. I have ordered a new and much improved material as a replacement.
Engine compartment stripped of old insulation awaiting new material
installation.
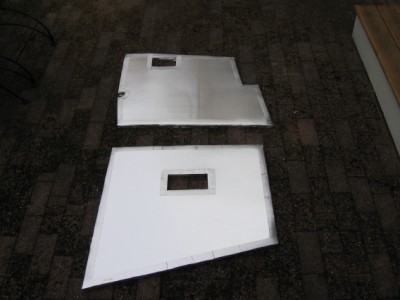
Here are the first two panels with cut outs for the oil changer,
the raw water strainer, and fuel lines. Pictures a little dark. The
material is very rugged ,e.g., silver rubber exterior and 3 layers of
foam behind. Should hold up very well.
More to come...
Here's the final sound proofing mounted with fenderwashers.
Watermaker Replacement:
We always had a sense that Shango's original watermaker was too small for our needs, e.g., 3 gallons per hour. However before we invested mucho bucks on a bigger one we wanted to take an extended cruise to verify that the investment was consistent with our needs and to also get a feel for the correct size. After our trip we learned that , one, a watermaker has indeed become a high priority for us justifying the expense. And two, the PUR was definitely too small. We tend to use 5 gallons per day when we are in economizing mode so we chose the Spectra Ventura 200 T which makes 8 gallons per hour. This production level should allow us to run the machine every couple days for several hours thereby hopefully meeting our needs. The unit is now on the boat and here is its prepared location under the nav seat where the air condition used to be....the only time we ever turned on the A/C was at survey! Installation will be an interesting affair. Stay tuned..
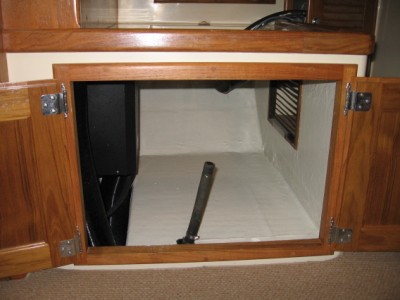
Future home for the Spectra Ventura 200 watermaker
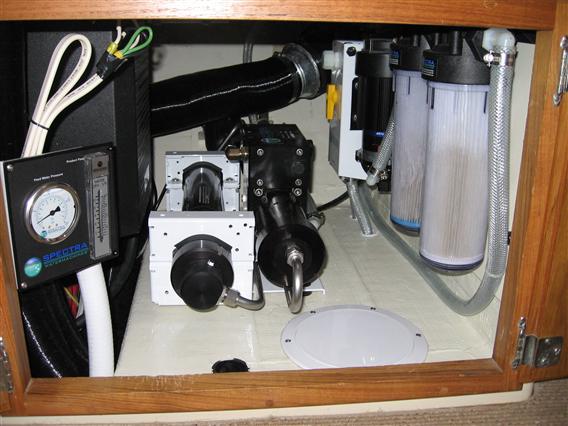
Here's the final install right after start-up. The unit made between 7 and 8 gallons per hour despite the water temperature being 52F. The unit is not recommended for temps below 50F. Higher pressures, higher amperage, and lower output can result.
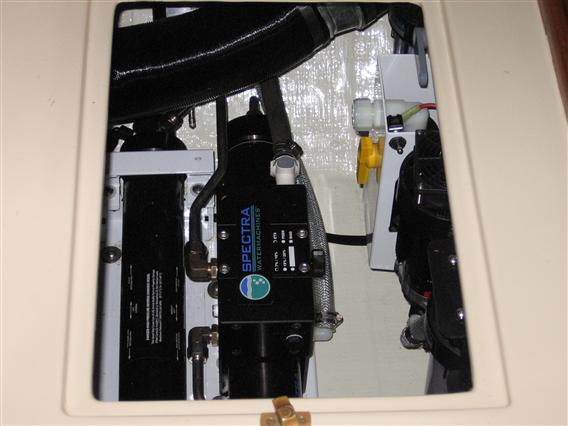
Another angle looking through the nav seat to below.
After 2 years of heavy use we are very satisfied with the unit. We make more than the 7 gallons per hour that is spec'ed, almost 8 gallons when the engine is not running and almost 9 when it is running. Against our better judgment, we used the unit in the Chesapeake for two weeks on the way back to New England and we fried the Shurflo pressure switch in the silty/dirty water. We jumped the switch as recommended in the manual and we were good to go. We replaced the pressure switch, adjusted it to the correct pressure and still experienced another failure. I have now permanently bypassed the pressure switch. As far as I can tell, the worse that could happen in this bypassed mode is that we would experience a rupture in our feed lines if we failed to open a tank for the feed lines to fill into. This has already happened even with the pressure switch in place!
New 6 Man Winslow Life Raft:
On each offshore trip we have always felt a bit nervous with our "use the RIB" life raft strategy. The thought of going on the foredeck, untying the 130 lb. beast, and getting it hoisted overboard in uncertain conditions always bothered us. We tried Ebay and to our surprise there were great values. We successfully bid on this 6 person 2007, never deployed life raft. Our savings were several thousand dollars!!
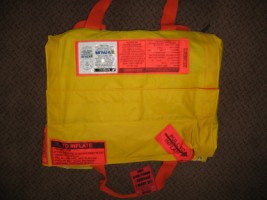
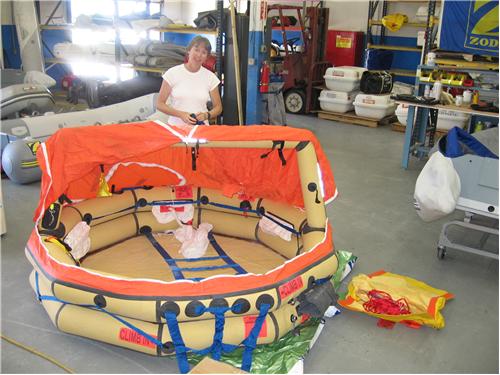
Here's Amy during our inspection, prior to repacking.
Sea Frost Freezer and Refrigerator:
We had been planning on replacing our 13 year old Glacier Bay Freezer/Refrigerator in the summer of 2010. Although we had had excellent experience with the unit, newer technology would allow us to rid ourselves of the huge compressor in the transom locker as well as the horrendous noise that it produced. From all the research I had done, the daily amperage as well as cooling/freezing performance would probably see little improvement. Noise, space, and planned replacement were the goals. Well, 10 days before our departure, the Glacier Bay had an unplanned stroke....all controls ceased to function. She worked as well as usual she just would not stop no matter what I did. With ten days to departure we had 2 choices. Call Washington to see if I could find a new control unit for a no longer made unit or move up our planned replacement by a year. We chose the later.
Our boat yard had installed 3 Sea Frost units that summer each with adoring owners. A cruising buddy knew the owner of Sea Frost and vouched for him. I spoke with the owner and learned that he had been installing his product on many recent PS40's. I was sold. The new unit is 12 volt. The freezer and refrigerator are separate units and each can run as either a fridge or freezer. They are very, very quiet. The amperage draw is less than 5 amps when running although they cycle many, many more times than the Glacier Bay.
As of September 2012 we continue to be very satisfied. The units do use the same amount of power as the Glacier Bay, although they are so quiet you can hardly hear them. As was the case also with Glacier Bay, in equatorial climates, the freezer's electrical draw out weighs the benefits so we convert the freezer to a very cold liquids fridge instead of a freezer. We have had three coolant leaks since our 2009 installation. Two in connections made by us and one by Sea Frost. This does not seem to be inconsistent with other cruisers' experiences. Sea Frost owners like every other cruiser with a fridge need to carry spare bottles of coolant and know how to check and tighten all loose connections. Additionally, in warm climates, appropriate ventilation is essential for the compressors.
A very efficient and effective unit but I wish Glacier Bay were still making marine products and had a holding plate system using a modern, compact and quiet 12 volt compressor. I miss the option of using the engine's alternator to in effect cool down the holding plate for free when you are under power.
Update as of January 2013. Over an incredibly frustrating 6 month period between 2 degrees South and 4 degrees North, read hot, our original 2 compressors failed and 2 replacement units likewise failed. The first failure was probably caused by the lack of ventilation. The reasons for the second set's failure are unclear and I could speculate for hours and have. I will just say that Cleave Horton, Sea Frost's owner, was great to work with during a very difficult period and did all he could do to try to figure out the mysteries of Shango's refrigeration woes. As of October 2014 we have had 22 months of trouble free and very effective operation with our second set of replacement compressors. Stay tuned but so far so good.
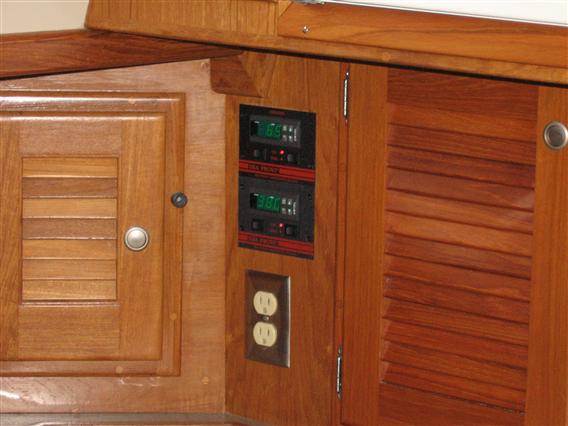
The temperature controls very conveniently fit in the old holes left by the Glacier Bay.
Monitor Windvane Installation:
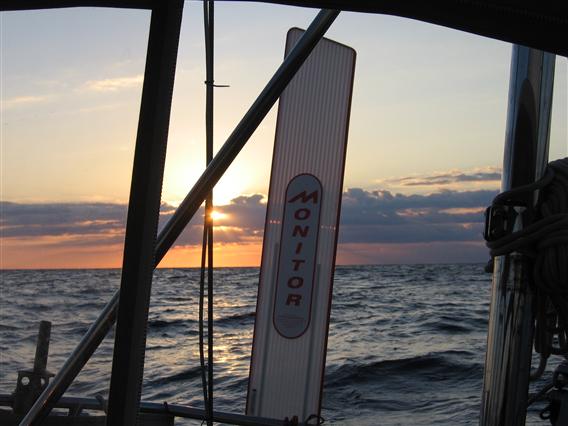
Here's the wind vane in use on our passage from Norfolk to the BVI. Hard to believe but all our sailing on this passage was done by the vane and we had no previous experience. This is not an advertisement but I can't say enough about the device. All day, all night it just keeps doing its thing. Better steering than a person or an autopilot on vane mode and no amps. Small changes required in wind angle control as conditions change but no big deal.
As of June 2012 still could not be happier with the ubit.
Amazing device.
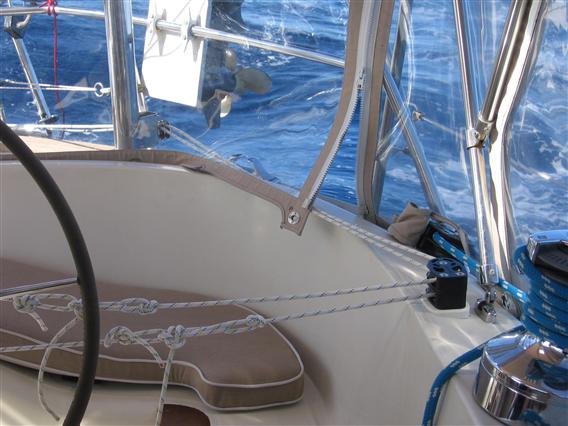
Here's the route for our control lines back to the Monitor
We were careful to position and size the turning block to the wheel. On long passages and long usage I wanted to avoid chafe as well as any mounting issues. We continue however to have a chafe issue on our starboard control line at the turning block on the Monitor frame. We seem to get about 2-3000 miles before we experience sufficient chafe to necessitate replacement. I have not yet found the fix for this.
After 3 years of use we are super happy with the unit. Customer service is also outstanding. During our initial days of use we found ourselves 350 miles southwest of Bermuda in a 4 day storm with winds in the 25-35 range around the clock. With stronger gusts on a reach we would find the unit being headed up a bit. I called the company via satellite phone for some one on one help and got some quick and easy advice which greatly improved performance. In the fall of 2010 we had a collision with another boat which damaged the pendulum. Again, I called the company, explained the problem and got excellent phone support over two days as I replaced the sacrificial tube and realligned the pendulum and its gears.
If I had not been able to fix our pendulum after our recent collision, I don't think we would have attempted our Pacific crossing until we had found a way to do so. Can't leave home without it.